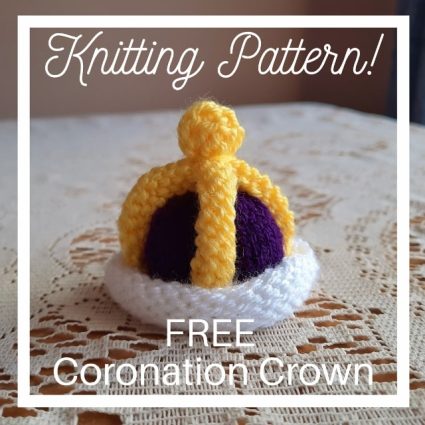
This little knitted coronation crown is quick and easy. This FREE knitting pattern will make a lovely Royal keepsake.
Made with oddments of white, purple and yellow double knitting yarn.
3mm single pointed needles were used. It is about 5cm tall and wide when finished.
Abbreviations : k – knit. p – purl. st – stitch. tog-together. st-st – Stocking Stitch (k1row, p1row).
Crown – Make 1
With white cast on 30 sts Starting with a purl row, st-st 10 rows – on the last row, to mark the pillars, add stitch markers at stitches 1, 8, 15, and 23 Change to purple Starting with a purl row, st-st 7 rows Next: (k1, k2tog) to end (20 sts) Purl 1 row Next: k2tog to end (10 sts) Draw thread through the remaining stitches and pull tight
Fold the piece in half and sew down the row ends. Leave the bottom of the crown un-curled for now.
Crown Pillars – Make 2
With yellow, cast on 26 sts Starting with a purl row, st-st 3 rows Cast off
Allow the piece to curl upon itself
Take one piece and lay it flat from side to side. Take the second piece and lay it at a right angle over the centre of the first piece. Take a length of yarn and fasten round the centre with a knot. See picture.
Next. Turn the work by 90 degrees and fold both ends of the first piece down and use the same piece of yarn and tie round the whole centre of the work. There should be 4 gold pillars now with a bobble shape in the centre of the work
Take one end of the piece and sew it to the first stitch marker, then the second piece to the second stitch marker and so on. Make sure the bobble is on the up side.
Curl the bottom white part of the crown out and over the stitches of the pillars.
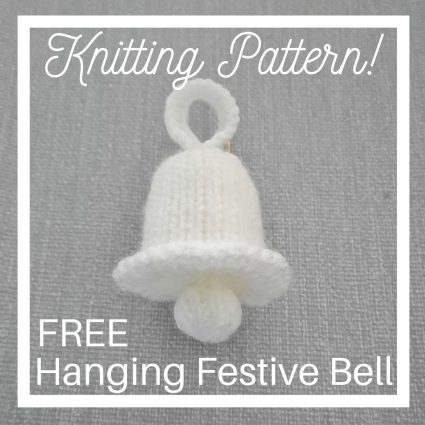
This little knitted Festive Bell is quick and easy. This FREE knitting pattern will make a lovely gift or hang it on your tree. Made with oddments of white double knitting yarn. 3mm single pointed needles were used. It is about 10cm tall when finished including the loop.
Bell—Make 1 (Inside of bell) With white, cast on 11 sts Purl 1 row Next: increase into every stitch (22 sts) Starting with a purl row, st-st 15 rows Next: (k1, inc1) to end (33 sts) (lower edge) Purl 2 rows Knit 1 row (Outside of bell) Next: (k1, k2tog) to end (22 sts) Starting with a purl row, st-st 15 rows Next: k2tog to end (11 sts) Draw the thread through the remaining stitches and pull tight
Fold the piece in half, sew down the row ends, gather the cast on stitches and seal up completely.
Push the cast on end inside the piece so that the cast on and cast off edges meet at the top of the bell.
Clapper—Make 1 With white, cast on 8 sts Purl 1 row Next: increase into every stitch (16 sts) Starting with a purl row, st-st 3 rows Next: k2tog to end (8 sts) Draw the thread through the remaining stitches and pull tight
Sew down the row ends. Add a tiny piece of toy stuffing and seal up. Hang inside the bell using a thread so the clanger is just outside the lower edge of the bell.
Loop—Make 1 With white cast on 20 sts Cast off Fold the loop in half and attach the ends to the top of the bell.
Wrap your gifts with a little extra purr-sonality and paw-some charm. These knitted dog and cat drawstring bags make gifting even more special—because it’s what’s on the outside that counts too.
This rabbit placemat and cup holder knitting pattern adds a cozy, personal touch to any table setting. Perfect for everyday use or special occasions like Easter.
Beau, Belle, Boo, and Bess are all wrapped up for Christmas! Follow their second adventure in this festive booklet, filled with holiday spirit and bear-sized fun.
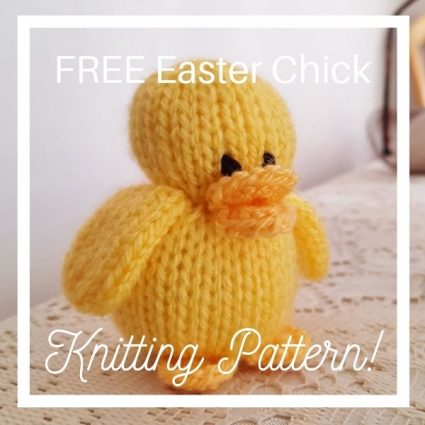
This little knitted chick is quick and easy and great for Easter gifts. He will make a great hanging festive Easter decoration or add him as a little ‘extra’ gift this year. He will make a great heirloom for years to come.
Made with oddments of orange and yellow double knitting yarn and a length of black for the eyes. You will need a little toy stuffing. 3mm single pointed needles were used. It is about 9cm tall when finished.
Abbreviations : k – knit. p – purl. st – stitch. tog-together. st-st – Stocking Stitch (k1row, p1row).
All Knitted Pieces
Main Body – Make 1
With yellow, cast on 10 sts Purl 1 row Next: increase into every stitch (20 sts) Purl 1 row Next: (k1, inc1) to end (30 sts) Starting with a purl row, st-st 11 rows Next: k2tog to end (15 sts) Neck : Purl 1 row Next: (inc1, inc1, k1) to end (25 sts) Starting with a purl row, st-st 9 rows Next: k2tog to last stitch, k1 (13 sts) Purl 1 row Draw thread through the remaining stitches and pull tight.
Sew down the row ends, add stuffing and seal up.
Beak – Make 2
Make one for upper beak and one for lower beak With orange, cast on 10 sts Knit 1 row Draw thread through the stitches and pull tight
Tie in the row ends. Place two pieces together so the ridged knit rows are together, it will make the beak part slightly.
Attach the beak at the front at the neck. Sew two eyes in black immediately above the beak and one stitch apart.
Feet – Make 2
With orange, follow the instructions for the beak. Make 1 piece for each foot.
Attach the foot to either side of the front, lower body.
Wings – Make 2
With yellow, cast on 14 sts Purl 1 row Next: inc1, knit to last stitch, inc1 Complete the last 2 rows until there are 22 sts on the needle Purl 1 row Next: k2tog to end (11 sts) Draw thread through the remaining stitches and pull tight
Sew down the row ends, the seam should be under the wing in the centre. Attach the cast on edge to the neck with a wing at either side of the body.
Learn how to knit a teddy with easy-to-follow patterns. Create soft, cuddly handmade bears perfect for gifts, keepsakes, and loved ones.
Most Recent Bear Knitting Patterns
There are new Bear Knitting Patterns coming along all the time. There is at least one new toy pattern every week. Here are the bears lovingly created recently. Instructions are available so that you can do the same. Pick from PDF or leaflet if you are in the UK
A soft knitted bear that gives warm hugs and holds a chocolate orange. The Bear Chocolate Hugs knitting pattern is a fun and easy project, perfect for Easter or Christmas gifts . Easy to follow with step-by-step instructions.
This product has multiple variants. The options may be chosen on the product page
Here is a FREE Tiny Bear Pattern that you can knit now!
Are you not sure if you want to purchase a pattern? Do you want to see if you can make one of the bear toys first? That’s great because here is a little free bear. You can start it now with needles and some spare double knitting yarn. See if you like the pattern style. You can always come back later for more bears !Suitable for beginners.
Looking for a fun and adorable knitting project? Grab our FREE Tiny Bear Knitting Pattern!... [More on Knitting Patterns]
22 Apr
Bears With Removable Clothing
The first thing small children do with a new toy is to take it’s clothes off. Luckily we have thought of that and here is a small selection of bears with removable clothes.
This product has multiple variants. The options may be chosen on the product page
A Large Knitted Family of Bears. Beau, Belle, Boo and Bess
For the knitter that likes a longer project. Here are our family of bears. Available as a booklet that will sit easily on the arm of the chair. Pick from the seaside, Christmas or bed time sets.
It’s bedtime for Beau, Belle, Boo, and Bess! This charming booklet follows the bears on their sleepy-time adventure, making it a cozy read for little ones.
Beau, Belle, Boo, and Bess are all wrapped up for Christmas! Follow their second adventure in this festive booklet, filled with holiday spirit and bear-sized fun.
Meet Beau, Belle, Boo, and Bess on their first adventure. A delightful booklet featuring these lovable knitted bears—perfect for storytelling and collectors.
It’s the Knitters Favourite Bears
Do you want to see what others like? Well, here are our 8 most popular bear knitting patterns for you to discover.
Knit the perfect bedtime buddy! This soft, snuggly bear is easy to make and perfect for little hands to cuddle. A great gift idea or a sweet addition to any handmade toy collection
Knitting pattern instructions to knit this cute bear bride and groom couple. All ready for the big day, these bears will make a great knitted wedding gift.
Beau, Belle, Boo, and Bess are all wrapped up for Christmas! Follow their second adventure in this festive booklet, filled with holiday spirit and bear-sized fun.
Here is a big knit. Bubble Gum is a big bear to get your needles going.
There is no doubt that all bears are adorable. They will be a cherished personal gift for any of your family and friends. There are knitting patterns for all budgets from short free knitting patterns to the longer projects in booklet format.
One Last Thing…
Have you seen our Bearwick bears? They are individual knitting patterns but complete to make the whole family.
This little knitted bee is quick and easy. This FREE Easter knitting pattern will make a lovely gift. Keep buzzy with this little striped insect.
Made with oddments of brown, white, cream/flesh and yellow double knitting yarn. Length of black for the eyes and red for the nose. Small amount of toy stuffing. 3mm single pointed needles were used. It is about 9cm tall when finished. He is great for Easter gifts and Easter Egg hunts too.
Abbreviations : k – knit. p – purl. st – stitch. tog-together. st-st – Stocking Stitch (k1row, p1row).
Body & Head – Make 1
Starting at the base, with yellow, cast on 10 sts Purl 1 row Change to brown and stripe with yellow every 2 rows Next: increase into every stitch (20 sts) Purl 1 row Next: (k1, inc1) to end (30 sts)
Starting with a purl row, st-st 13 rows Next: k2tog to end (15 sts)
Change to cream/flesh for the head Purl 1 row Next: (inc1, inc1, k1) to end (25 sts) Starting with a purl row, st-st 11 rows Next: k2tog to last stitch, k1 (13 sts) Purl 1 row Draw thread through the remaining stitches and pull tight.
Sew down the row ends, add stuffing and seal up. Make sure the neck line is indented to define a separate head and body when stuffing. Take a piece of cream yarn, wrap it round the neck and tie tightly at the back so the neck keeps the shape. (This is optional)
Wings- Make 4
With white, cast on 6 sts Purl 1 row Next: inc1, knit to last stitch, inc1 Complete the last 2 rows until there are 16 sts on the needle Purl 1 row Next: k2tog to end (8 sts) Draw thread through the remaining stitches and pull tight
Sew down the row ends. Attach the cast on edge to the body with two wings at either side of the back of the body.
Hat – Make 1
With yellow, cast on 28 sts Knit 1 row Change to brown and stripe with yellow every 2 rows for the rest of the piece Starting with a knit row, st-st 10 rows Next: k2tog to end (14 sts) Purl 1 row Draw thread through the remaining stitches and pull tight Sew down the row ends and place the hat on the head
Sew a nose in red with 3 horizontal stitches at the centre of the face. Sew two eyes in black just above the nose.
Antennae – Make 1
With yellow, cast on 30 sts Starting with a purl row, st-st 3 rows Cast off Allow the piece to curl upon itself and sew down the length. Bring the ends into a centre to make 2 loops. Secure in the centre with yellow yarn and attach to the top of the hat.
This little knitted robin is quick and easy. He will make a great hanging festive Christmas decoration or add him as a little ‘extra’ gift this year. He will make a great heirloom for years to come.
Made with oddments of brown, red and yellow double knitting yarn and a length of black for the eyes. You will need a little toy stuffing. 3mm single pointed needles were used. It is about 9cm tall when finished.
Abbreviations : k – knit. p – purl. st – stitch. tog-together. st-st – Stocking Stitch (k1row, p1row).
All Knitted Pieces
Main Body – Make 1
With red, cast on 10 sts Purl 1 row Next: increase into every stitch (20 sts) Purl 1 row Next: (k1, inc1) to end (30 sts) Starting with a purl row, st-st 11 rows Next: k2tog to end (15 sts) Change to brown Starting with a purl row, st-st 3 rows Next: (inc1, inc1, k1) to end (25 sts) Starting with a purl row, st-st 9 rows Next: k2tog to last stitch, k1 (13 sts) Purl 1 row Draw thread through the remaining stitches and pull tight.
Sew down the row ends, add stuffing and seal up.
Beak – Make 2
Make one for upper beak and one for lower beak With yellow, cast on 10 sts Knit 1 row Draw thread through the stitches and pull tight
Tie in the row ends. Place two pieces together so the ridged knit rows are together, it will make the beak part slightly when placed on the robin.
Attach the beak at the front over the colour change. Sew two eyes in black immediately above the beak and one stitch apart.
Wings – Make 1
The wing is made in one piece and will wrap around the outside of the body. The back of the piece will be shaped to come to a point.
With brown, cast on 30 sts Knit 1 row Next: k2, inc1, k10, k2tog, k2tog, k10, inc1, k2 (30 sts) Next: k2, purl to last 2 sts, k2 Complete the last 2 rows 6 times in total (12 rows)
Next: (k2, k2tog) to last 2 sts, k2 (23 sts) Cast off in purl
Sew the cast off edge to the body half way up at the colour change. Leave a gap at the front centre. The back will be pointed.
Hanging Cord – Make 1
If you want to hang your robin from a Christmas tree then it will need a hanging cord. You can make one from yarn as below, or you could use ribbon or cotton as you like instead.
Cut 3 pieces of red yarn about 1 metre long each. A twisted cord is made by taking the yarn and fasten all three lengths to one end of a static object for example a door handle. Take the other end of the yarn and twist lots of times. Then allow the yarn to fold in half upon itself and it will twist. Knot the open end to stop the twist from unravelling. Cut to the length desired and attach to the top of the head.
Squeak your way into adorable knitting with Biscuit the Mouse! This charming knitted mouse soft toy comes dressed in trousers and a waistcoat—an easy and fun project
This little Chocolate Teapot knitting pattern is quick and easy. This FREE pattern will make a lovely gift with a chocolate orange inside or decorate your home. Add it to your knitted cake collection.
The body of the tea pot is a void where you can put a chocolate orange or a bath bombe or similar as a gift.
Made with oddments of cream knitting yarn but you can use any colour you like. 3mm single pointed needles were used. It is about 13cm high and will fit a chocolate orange inside the teapot. You will need two small pieces of toy stuffing about the size of a cotton ball.
It is important to knit with double knitting yarn and 3mm needles (26 sts x 33 rows = 10cm square) so that your chocolate orange will fit snugly inside.
Abbreviations : k – knit. p – purl. st – stitch. tog-together. st-st – Stocking Stitch (k1row, p1row).
This is what the component parts will look like…
Teapot Body and Spout – Make 1
Starting at the base, with your chosen colour, cast on 46 sts Starting with a purl row, st-st 11 rows
Divide for the spout. Next: purl 38 sts and turn work. Next: knit 16 sts and turn work again. Work with this set of 16 sts in the middle of the work only. There will be 22 sts on either needle that can be left for now or put onto a stitch holder as you prefer.
Purl 1 row Next: k2tog, k5, inc1, inc1, k5, k2tog (16 sts) Purl 1 row Complete the last 2 rows 5 times in total (10 rows) Cast off
Reconnect yarn to the remaining stitches and purl to the end Knit along all stitches on both needles (44 sts) Starting with a purl row, st-st 9 rows Cast off
Sew down the row ends of the piece. Sew down the spout. Allow the upper and lower edges to curl. Curl over top of the spout too. Add a little toy stuffing down the spout to help it keep the shape. (optional)
Handle – Make 1
With your chosen colour, cast on 12 sts Starting with a purl row, st-st 33 rows Next: k2tog to end (6 sts) Draw thread through the remaining stitches and pull tight.
Sew down the row ends of the handle. Attach the cast on edge at the top of the handle over the seam (see picture) with the handle pointing up. This will help with the curl of the handle at the top. Bend over and attach the bound off stitches at the bottom of the main piece to finish the handle.
Lid – Make 1
With your chosen colour, cast on 10 sts Purl 1 row Next: increase into every stitch (20 sts) Purl 1 row Next: (k1, inc1) to end (30 sts) Starting with a purl row, st-st 3 rows Purl 1 row (edge of lid)
Starting with a purl row, st-st 3 rows Next: (k1, k2tog) to end (20 sts) Purl 1 row Next: k2tog to end (10 sts) Purl 1 row (Nobby handle) Next: increase into every stitch (20 sts) Starting with a purl row, st-st 7 rows Next: k2tog to end (10 sts) Draw thread through the remaining stitches and pull tight
Sew down the row ends. Add a small amount of toy stuffing about the size of a cotton ball to the top of the lid. Fold the lower half of the piece so that the extra purl row is on the outer edge and the base is flat. Stitch from underneath through to the upper lid and back through again to make sure it stays flat and keeps the shape.
Here is an alternative to a traditional Orange Cover. Our snowman knitting pattern will hold an orange in his belly and won't deflate when the orange is removed.
Santa’s reindeer have a new job—keeping pyjamas tidy. This soft and functional knitting pattern is perfect for adding a bit of holiday magic to bedtime.
A heavenly addition to your festive knitting! This angel soft toy is perfect for Christmas displays, gifting, or adding a handmade touch to the season.
This little knitted hanging dolly decoration is quick and easy. This FREE toy knitting pattern will make a lovely gift or hang as a decoration in your home.
Suggestion : Make a hanging Christmas gift in traditional colours. You could make a hanging decoration for your Chirstmas tree too. Add a little tinsel for some sparkle or ribbon to make it extra special.
Pic thanks to Angie Taylor
Suggestion 2 : Make a hanging pram charm or nursery decoration. Add it to your other knitted gifts as a little something extra special.
Made with oddments of white, pink and cream/flesh double knitting yarn. A length of black for the eyes. Small amount of toy stuffing. 3mm single pointed needles were used. It is about 10cm from the top of the hat to the skirt. Make the legs and hanging loop as long as you like.
Abbreviations : k – knit. p – purl. st – stitch. tog-together. st-st – Stocking Stitch (k1row, p1row).
This is what the component parts will look like…
Body & Head – Make 1
Starting at the base, with pink, cast on 10 sts Purl 1 row Next: increase into every stitch (20 sts)
Starting with a purl row, st-st 9 rows Next: k2tog to end (10 sts)
Change to cream/flesh Purl 1 row Next: increase into every stitch (20 sts) Starting with a purl row, st-st 11 rows Next: k2tog to end (10 sts) Draw thread through the remaining stitches and pull tight.
Sew down the row ends, add stuffing and seal up. Make sure the neck line is indented to define a separate head and body when stuffing. Take a piece of yarn, wrap it round the neck and tie at the back so the neck keeps the shape. (This is optional)
Hat – Make 1
With pink, cast on 24 sts Starting with a purl row, st-st 11 rows Next: k2tog to end (12 sts) Draw thread through the remaining stitches and pull tight.
Sew down the row ends of the hat, allow the cast on rows to curl and place on the head.
Dress – Make 1
With pink, cast on 44 sts Starting with a purl row, st-st 13 rows Next (k2, k2tog) to end (33 sts) Purl 1 row Next: (k1, k2tog) to end (22 sts) Change to white Starting with a purl row, st-st 5 rows Cast off
Sew down the row ends. Allow the top and bottom to curl. The cord for the arms will go under the collar at the back. Place the white rim round the neck of the body.
Arms and Legs
For the arms and legs, make a twisted cord and knit a foot or hand on either end. Cut 3 pieces of white yarn about 1 metre long each and follow the instructions to make a twisted cord below. You will need to make one cord for the arms and one for the legs.
A twisted cord is made by taking the yarn and fasten all three lengths to one end of a static object for example a door handle. Take the other end of the yarn and twist lots of times. Then allow the yarn to fold in half upon itself and it will twist. Knot the open end to stop the twist from unravelling. Cut to the length desired.
Feet and Hands- Make 4
With white, cast on 10 sts Starting with a purl row, st-st 3 rows Change to pink Starting with a knit row, st-st 4 rows Draw thread through the stitches and pull tight
Allow the white edge to curl over. Place the knot from the twisted cord into the piece at the white end and then sew down the row ends. Make sure the twisted cord is secure as you go.
For the legs, fold the cord in half and sew it to the bottom of the body.
For the arms, fold the cord in half and attach it at the back. Then take the cord round the back of the neck to the shoulder and attach with a stitch at either side. It is possible to hide the cord under the collar of the dress if desired.
Hanging Cord – Make 1
Make a hanging cord in pink the same as the legs and arms above. Knot it into a loop and attach it to the top of the hat.
To finish, split a length of black yarn and sew two eyes to the front of the face about 2 sts apart.
If you enjoyed this pattern and want to share it, please redirect your friends to this website instead of sharing the text and pictures. Thanks.
Hopping and Bopping. Here is Dotty the 50s style dolly. She has a flared dress, head scarf and dancing shoes. A large knitting pattern to get your needles clicking.
This Bog Dog toilet roll cover is ready to sit and stay on your bathroom shelf. A quirky knitting pattern that keeps spare rolls covered while adding a bit of tail-wagging charm.
Create a festive teddy and matching stocking with this knitting pattern. A heartwarming Christmas project that makes a thoughtful handmade gift or a cozy seasonal decoration.
Create a charming, easy-to-knit baby keepsake with this free pattern. Perfect for newborn gifts, knit in classic pink, blue, or neutral white.
If you are having a baby shower, you could make one for each guest or use it as a reveal to tell family and friends if it is a girl or boy.
If you are an expectant grandparent, it would make a great birthday keepsake for a new arrival.
Made with oddments of white, and cream/flesh double knitting yarn. A length of grey for the eyes. Small amount of toy stuffing. 3mm single pointed needles were used. It is about 10cm tall when finished.
Abbreviations : k – knit. p – purl. st – stitch. tog-together. st-st – Stocking Stitch (k1row, p1row).
Body & Head – Make 1
Starting at the base, with white, cast on 10 sts Purl 1 row Next: increase into every stitch (20 sts) Purl 1 row Next: (k1, inc1) to end (30 sts)
Starting with a purl row, st-st 13 rows Next: k2tog to end (15 sts)
Change to cream/flesh Purl 1 row Next: (inc1, inc1, k1) to end (25 sts) Starting with a purl row, st-st 11 rows Next: k2tog to last stitch, k1 (13 sts) Purl 1 row Draw thread through the remaining stitches and pull tight.
Sew down the row ends, add stuffing and seal up. Make sure the neck line is indented to define a separate head and body when stuffing. Take a piece of white yarn, wrap it round the neck and tie tightly at the back so the neck keeps the shape. (This is optional)
Hat – Make 1
With white, cast on 28 sts Knit 1 row Starting with a knit row, st-st 10 rows Next: (k2, k2tog) to end (21 sts) Starting with a purl row, st-st 9 rows Next: (k1, k2tog) to end (14 sts) Starting with a purl row, st-st 9 rows Next: k2tog to end (7 sts) Draw thread through the remaining stitches and pull tight.
Sew down the row ends of the hat and place on the head. Fold the top half of the hat over back to the rim on one side and secure with a stitch.
Arms- Make 2
With white, cast on 6 sts Purl 1 row Next: increase into every stitch (12 sts) Starting with a purl row, st-st 3 rows Change to cream/flesh Starting with a knit row, st-st 2 rows Next: k2tog to end (6 sts) Draw thread through the remaining stitches and pull tight
Sew down the row ends. Add a tiny amount of toy stuffing and seal up. Attach the arms at either side of the body piece at the shoulders
To finish, split a length of grey yarn and sew two eyes in a ‘U’ shape to the front of the face.
If you enjoyed this pattern and want to share it, please redirect your friends to this website instead of sharing the text and pictures. Thanks.
If you loved making this free baby knitting pattern, why not try more adorable knitted toy patterns? Handmade toys make perfect keepsakes for newborns, baby showers, and little ones to cherish.
We specialize in easy toy knitting patterns, perfect for both beginners and experienced knitters. From cute knitted animals to soft baby comforters, you’ll find plenty of inspiration for your next project.
Here are some of our most popular baby-safe knitted toy patterns:
All of our free knitting patterns for baby toys come with step-by-step instructions, making them enjoyable to create. Whether you’re knitting a soft plush toy for a newborn or a handmade cuddly friend for a toddler, our patterns are designed for safe, snuggly fun.
Download More Knitting Patterns
Browse our full collection of knitted toy patterns and start your next project today. Happy knitting!
Is there a new baby on the way? Fancy an easy knit that will look great in the nursery? Here is our easy knit baby. Simple shapes and cute lines will leave you loving this knitting pattern.
Burly baby is everything you could want in a toy knitting pattern. He is a little cutie in his nappy, complete with pin. He has mittens, hat and bootees too.
Wrap your gifts with a little extra purr-sonality and paw-some charm. These knitted dog and cat drawstring bags make gifting even more special—because it’s what’s on the outside that counts too.
This rabbit toilet roll cover knitting pattern is perfect for when nature calls. A fun and quirky way to disguise spare rolls—because every bathroom could use a little more hop-tastic charm.
Take your essentials for a walk with this adorable dog-shaped rucksack knitting pattern. This pup won’t fetch, but it will carry your things in style—no lead required.
This little knitted caterpillar is quick and easy. Use any colours you like, in any order you like. Make it as long as you like too !
Made with oddments of white and green knitting yarn. Small amount of toy stuffing. 3mm single pointed needles were used. It is about 22cm long with 4 sections and a head when finished.
Abbreviations : k – knit. p – purl. st – stitch. tog-together. st-st – Stocking Stitch (k1row, p1row).
Body & Head – Make 1
Starting at the tail of the caterpillar, with your first colour, cast on 10 sts ** The repeat begins here for each section ** Purl 1 row Next: increase into every stitch (20 sts) Purl 1 row Next: (k1, inc1) to end (30 sts)
Starting with a purl row, st-st 9 rows Next: (k1, k2tog) to end (20 sts) Purl 1 row Next: k2tog to end (10 sts)
Change to the next colour Repeat the sequence again from ** The repeat begins here for each section ** at the beginning of the pattern. Do this repeat the number of times you like, once for each section to make the caterpillar as long as you want. Stop repeating when you get to the head.
HEAD Change to the head colour Purl 1 row Next: increase into every stitch (20 sts) Purl 1 row Next: (k1, inc1) to end (30 sts) Purl 1 row Next: (k2, inc1) to end (40 sts)
Starting with a purl row, st-st 13 rows
Next: (k2, k2tog) to end (30 sts) Purl 1 row Next: (k1, k2tog) to end (20 sts) Purl 1 row Next: k2tog to end (10 sts) Draw thread through the remaining stitches and pull tight.
Gather the cast on stitches. Sew down the row ends, add stuffing as you go and seal up.
To finish, sew two black eyes the front of the face. Add green eyebrows, a smile and two horizontal stitches for the nose.
If you enjoyed this pattern and want to share it, please redirect your friends to this website instead of sharing the text and pictures. Thanks.
Burly baby is everything you could want in a toy knitting pattern. He is a little cutie in his nappy, complete with pin. He has mittens, hat and bootees too.
Is there a new baby on the way? Fancy an easy knit that will look great in the nursery? Here is our easy knit baby. Simple shapes and cute lines will leave you loving this knitting pattern.
Made with oddments of cream, pink and grey double knitting yarn. Small amount of toy stuffing. 3mm single pointed needles were used. It is about 10cm tall when finished.
Abbreviations : k – knit. p – purl. st – stitch. tog-together. st-st – Stocking Stitch (k1row, p1row).
Body & Head – Make 1
Starting at the base, with cream, cast on 10 sts Purl 1 row Next: increase into every stitch (20 sts) Purl 1 row Next: (k1, inc1) to end (30 sts)
Purl 3 rows Starting with a knit row, st-st 16 rows Next: k2tog to end (15 sts)
Purl 1 row Next: (inc1, inc1, k1) to end (25 sts) Starting with a purl row, st-st 9 rows Next: k2tog to last stitch, k1 (13 sts) Purl 1 row Draw thread through the remaining stitches and pull tight.
Sew down the row ends, add stuffing and seal up. Make sure the bottom is flat so it will stand and the neck line is indented to define a separate head and body.
Scarf – Make 1
With pink, cast on 40 sts Next: (k1, p1) to end Complete the last row 4 times in total Cast off in pattern
Sew down the row ends and place over the head and round the neck
Ears- Make 2
With cream cast on 14 sts Starting with a purl row, st-st 15 rows Next: k2tog to end (7 sts) Purl 1 row Draw thread through the remaining stitches and pull tight
Fold in half and sew down the row ends. Fold the cast on edge in half again. Place the ear on the side of the head approx 4 rows from the top of the head. Sew the cast on edge in place.
To finish, sew two grey eyes in a ‘U’ shape to the front of the face and also two horizontal stitches for the nose.
If you enjoyed this pattern and want to share it, please redirect your friends to this website instead of sharing the text and pictures. Thanks.
Here is Ronnie, he is an original, novelty knitting pattern. He will hold a chocolate egg in his belly and looks sweet too. A brilliant idea for an Easter gift.
Feeling the chill? This "It's a Bit Breezy" knitting pattern has you covered—literally. A light and airy knit that’s perfect for when the weather just can’t make up its mind.
Beau, Belle, Boo, and Bess are all wrapped up for Christmas! Follow their second adventure in this festive booklet, filled with holiday spirit and bear-sized fun.
This little knitted fish is in a rainbow style. It is quick and easy to make.
Made with oddments of double knitting yarn. A small amount of toy stuffing. 3mm single pointed needles were used. It is about 12 cm from end to end when finished.
Change colours and yarn as you like if you don’t want to use the rainbow colours.
Abbreviations : k – knit. p – purl. st – stitch. tog-together. inc – increase by knitting into the front and back of the stitch. st-st – Stocking Stitch (k1row, p1row).
Fish – Make 2
Start at the tail. With red, cast on 20 sts Purl 1 row Next: k2tog, knit to last 2 stitches, k2tog (18 sts)
Purl 1 row Next: k2tog, knit to last 2 stitches, k2tog Colour : Change to orange now and then change to yellow, green, blue, indigo, violet every 6 rows to the end of the piece Complete the last 2 rows until 10 sts remain
Body Purl 1 row Next: inc1, knit to last stitch, inc1 Complete the last 2 rows until there are 20 sts
Starting with a purl row, st-st 9 rows
Next: k2tog, knit to last 2 stitches, k2tog Purl 1 row Complete the last 2 rows until 10 sts remain
Cast off
Place both sides of the fish together, sew around the outside, add stuffing and seal up. Sew an eye on either side with black yarn. Go over the stitch several times until you have the shape you like.
Cuddles the Cat is here to curl up in your arms, ready for snuggles. This soft toy knitting pattern is great for cat lovers, gift-making, or anyone who enjoys crafting cute companions.